1. Thank You and Here is Your Download
Hi,
Thank you for downloading [title of book/report] and thank you for subscribing to my list [name of list].
===Add download link here===
As a subscriber to my list I will be sending out emails to you two or three times per week. I strive to keep you updated in the world of [add topic], with all the important news and developments.
Make sure you download your report from the above link.
Thank you again, and I look forward to getting to know you some more.
Regards
[Your name, email, website]
P.S. If you have any questions regarding this report feel free to email me, just hit reply to this message and I will get back to you quickly.
2. Setting Up Your Online Business</h4
Hi,
Hope you are having a great day. Today let’s start discussing how to set up your own online business. This information will also apply to any brick and mortar business that wants to have an online presence as well.
My goal here is to keep things simple. While practically any topic can become more involved, I plan on keeping to the basics. Once you are feeling more comfortable with websites and hosting then you can start to get a little creative and use paid themes and plugins to really make your website sparkle.
There are two main items that you need to conduct business online.
- You need to have an online address – this is known as an URL. Examples would be:
Yourbusinessname.com
This is also referred to as your Domain name, the address you will be known by online.
- You need to have the ability to add content to this address. In other words a home. This would take the form of your hosting company. This is where you content would reside. When a person clicks on yourbusinessname.com a webpage will display.
This would be your Hosting Company – the place where all of your content is going to reside.
Recommendations for Domain names include:
Namecheap – [insert your affiliate link Or link to the provider that you use.]
When it comes to hosting this is the company that I like to suggest to people.
[Add your recommendation here]
It can get a little confusing when choosing a hosting plan. For starters I would just suggest that you go with a basic plan. One that accommodate just one website for now. It is very easy to upgrade quickly when and if the time becomes necessary.
Your goal today is to just get started with your new online presence.
I don’t want to overwhelm you with any more information today. So please expect another email from me in a day or two with more content on this subject.
In the meantime if you have questions feel free to reply to this email. If you have questions about your hosting or domain names then send them in a support ticket. A good company will respond quickly to you and help you solve your issues.
Thanks again for reading and have a wonderful day.
[Your name, email, website]
P.S. If you have any questions regarding this report feel free to email me, just hit reply to this message and I will get back to you quickly. Or customize with a link to a relevant product on this topic.
3. Setting Up Your Website
Hi,
Hopefully you now have a domain name registered and living on your hosting account. Today let’s discuss your next step.
Now that you have your website shell set up, your next step is to fill this shell with a template or theme. Your theme is the design of your website, and you don’t need to have a super crazy look.
You may have heard of HTML websites and this refers to websites that had to be written with a bunch of code. While these are still in effect today, they take a lot of maintenance. They are expensive and time consuming.
Today you want to install a WordPress theme. There are literally thousands of free and paid themes in just about every color you can imagine.
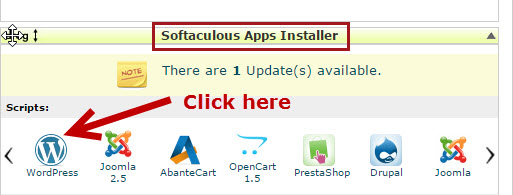
To install WordPress you have to log into your hosting account and set it up via your Cpanel. How this method works varies a little depending upon your hosting company.
The two most popular ways of installing WordPress is with Fantastico and Softaculous. Here’s a quick screenshot of what to look for.
During the set up process you will be asked if you want to email your user login and password information to you. Definitely do this so you have it tucked away in a safe place.
I would recommend you create a Folder inside your Gmail account and name it Hosting Info and store it there.
Please note: Any website can become victim of a Hack. To help protect your site it is recommended that you NOT use ADMIN as your Username. Try to make it something a little harder to guess. The same applies to your Password, don’t use sequential numbers, birthdays, your phone number or house digits.
Do this step today and I will be back tomorrow with how to access your Administration panel and how to start choosing your theme.
Thanks again for reading and enjoy your day.
[Your name, email, website]
P.S. If you have any questions regarding this report feel free to email me, just hit reply to this message and I will get back to you quickly. Or customize with a link to a relevant product on this topic.
4. Installing Your WordPress Theme
Hi,
How did you manage with installing WordPress on your hosting account? Remember if you get stuck ask for help. Another great resource is searching for YouTube videos on this topic. I have done this many times when I was stuck with something, they can really be helpful.
Today’s task is to get your shell filled with a theme. Keep in mind that you can always change your theme later on. So I won’t spend too much time on choosing one. Let’s get something set up so you can start creating content on your site first.
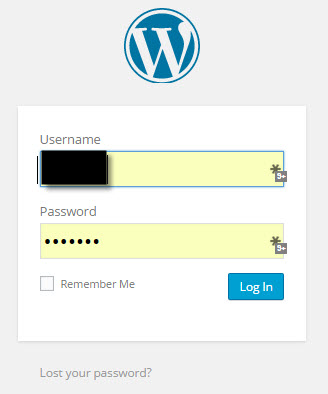
After you installed WordPress you would have received a log in address via email.
When you click on this link it takes you to something that looks like this:
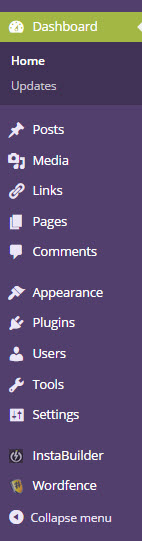
Once inside your Dashboard you will see a menu similar to the one below:
You can search the most Featured, Popular and Latest. There are also Filters you can apply which can be useful if you are looking for a theme that has columns, a certain color or is classified a Magazine or Ecommerce theme. Take a look at a few and choose one for now.
Click on the Preview button to see what it will look like first, then Activate your favorite one for now.
Once you have that down you now have a wonderful new theme on your WordPress.
Tip: If you have certain colors that you currently use for branding then try to select those in your theme. Things like a new Header can be created for you quite easily at a later date.
Have fun and feel free to email me with a link to your new site once your theme is chosen.
[Your name, email, website]
P.S. If you have any questions regarding this report feel free to email me, just hit reply to this message and I will get back to you quickly. Or customize with a link to a relevant product on this topic.
5. WordPress Tips
Hi,
Some people are still feeling a little overwhelmed when it comes to choosing a theme. I really can’t stress enough the importance of just getting a theme in place for now.
Yes there are lots of paid themes and I use one myself called [Add recommendation]. But when I first started out online I used a free one.
The reason why I suggest using a free theme at first is because you are not show of how your site is going to look. And how it is going to evolve over time. At least hold off on going with a premium theme until you have the bare bones of your website in place.
There are two important issues to address with any WordPress site.
Ensure that your theme is mobile responsive, many are but just check for this feature anyway.
Here’s a great report I wrote on Mobile Friendly websites. [Customize the Mobile Friendly Website PLR Pack and link to it here.]
WordPress Security is important. You don’t want hackers to get into your site and cause havoc on all your hardwork. One thing that you can do, and this was suggested to me by my hosting account is to install a plugin called “Wordfence”. This adds a layer of protection to your site.
Wordfence will email if someone tries to log into your site. One week I had over 30 attempts on one of my sites alone. They finally got fed up and left me alone. I hate to think what might have happened if I didn’t have this installed!
To install it go to Plugins – Add New – Search for Wordfence and then click to install it.
Keep those two things in mind today and install Wordfence on your site, be sure to add your email address in the Options section so you can get notified of any updates and issues.
Take care and will be back in a couple of days with more info for you.
[Your name, email, website]
P.S. If you have any questions regarding this report feel free to email me, just hit reply to this message and I will get back to you quickly. Or customize with a link to a relevant product on this topic.
6. WordPress Plugins
Hi,
So one thing that has come up is that of what a Plugin does to your site and which ones you need to use.
Now for an important warning! Don’t go crazy and install a ton of Plugins, as they can cause havoc with your loading times etc. on your site.
They can also eat into your usage amounts on your hosting account. If this happens your host can actually shut your website down until you fix the issue.
Go ahead and install and try out a plugin but don’t keep it if you are not going to use it.
A Plugin is an application that helps add functionality to your website. Here are a couple of examples:
Easy Digital Downloads & Woo Commerce – these are Plugins that add a shopping cart feature to your site. Useful if you are selling your own ebooks and reports.
Thrive Content Builder, Instabulider & Optimize Press – these are plugins that help you create Sales pages, Squeeze pages and more. Think of them as customizable templates.
Social Plugins – this is what creates those social buttons on websites.
When it comes to plugins there is pretty much a plugin that works for everything you can think of.
Another word of caution. If the developer stops supporting the Plugin – meaning they are not updating it anymore. Stop using it and find a replacement. Old unsupported plugins are yet another way hackers can get into your site.
If you have any additional questions on this topic let me know.
Thanks
[Your name, email, website]
P.S. This is a great place to add an affiliate or to test out the reaction to a new product.
7. Now that Your Site is Set Up
Hi,
Now that you have your site set up your next step is to start thinking about what type of content to add. Plus you want to think about the purpose of your website.
- Is your website a showcase of your business?
- Are you planning on selling and creating a service or your own products?
- Is your goal a niche website so you can sell affiliate products?
By defining your purpose you will know how to set your site up. For example if you want to sell lots of products then you will need to look for a shopping cart software.
If it is a service based site then you will need to add a portfolio section to it.
For a niche site you will want to set it up so that you can review products on it.
Today’s goal is to define your purpose of your site. Write it out on a piece of paper or outline it in Evernote. Also make a note of any features that you may want to add to your site, either now or in the future. For example if you are selling your own products you may want to include an Affiliate program. If so look for a shopping cart that has this integrated in it.
In my next email we will start discussing adding content to your website.
[Your name, email, website]
P.S. If you have any questions regarding this report feel free to email me, just hit reply to this message and I will get back to you quickly. Or customize with a link to a relevant product on this topic.
8. Adding Pages & Posts to Your New Site
Hi,
As promised in my last email it is now time to start adding content to your website.
There are a number of basic pages any website or blog should include:
- About Page
- Terms & Conditions
- Disclaimers
- Portfolio – good for freelance and service sites
Other pages you may want to consider, depending upon your business are:
- Location map
- Phone number & Contact Info
- Store or Product Page
- Review Page
Another item you will want to think about is your home page. This is the page that your visitor lands on when they type your web address into their browser.
This page can be your latest blog post or it can be a static page. A static page is often good for a business site or ecommerce type store. This page can be easily set inside your WordPress Dashboard under Settings.
Inside WordPress there are two ways to add content to your site:
- Pages
- Posts
To create an About Page you would use the Page feature. This will add a link to this page in your menu.
Posts are usually used to create everyday posts that are displayed by the newest content first. As in a blog page.
For my blog I use the Post feature and I add categories so readers can easily find more related posts on the same topic.
For today go into your Dashboard and create the pages you need and publish them to your site. You can go back in and add the content tomorrow. Just get your basic outline set up for today.
Thanks for reading
[Your name, email, website]
P.S. If you have any questions regarding this report feel free to email me, just hit reply to this message and I will get back to you quickly. Or customize with a link to a relevant product on this topic.
9. It’s Time for Content
Hi,
Congratulations you have made it this far and now it is time to add some actual content to your new site.
First let’s start with the About Page that you created yesterday. What you add here will depend upon your business. I like to make my about page friendly and inviting. Basically just tell your readers what your site is about, and what they can expect when they visit.
Here’s a link to my About Page: [insert link]
Now let’s add some actual content to your site.
Using the Post’s feature we will create a blog post or write an article. Again this will vary depending upon your business model.
Let’s say you are creating a niche site about [add topic]. Now if you are writing about a topic that you currently know, it will be easy to write about 500 words on this topic.
If not you have a couple of choices. You can do your own research on the topic and create a new post. Or you can use some ready to go content. This type of content is known as PLR content. It comes with a licence that allows you to make changes to it, such as changing the title, adding your own name to it and more. So basically you are just customizing it and publishing it on your blog.
When looking for PLR use quality content. This is my favorite source of PLR content:
Buy PLR Today [add affiliate link/or link to your favorite source – aff link here: http://buyplrtoday.com/amember/aff/signup]
Keep these pointers in mind for your posts:
- 500 words
- Add one or two images – here’s my favorite image site: Pixabay
- Link to an outside source – affiliate program, product or information source
Now there is another important element that your business requires. I don’t want to overwhelm you with too much information so I will cover this in my next email. Stay tuned as it really is important.
Thanks for reading
[Your name, email, website]
P.S. If you have any questions regarding this report feel free to email me, just hit reply to this message and I will get back to you quickly. Or customize with a link to a relevant product on this topic.
10. The All Important World of List Building
Hi,
Today’s topic is really important so please make sure you save this so you can refer to it again later on.
You may have heard or read the cliché ‘the money is in the list’.
Now this is very true for ALL business owners for several reasons:
- Having a list allows you to stay connected to your customers/readers and perspective buyers.
- By emailing your list regularly you can build a relationship with your subscribers. It has been shown that when your subscribers Know, Like and Trust you they will be more willing to buy from you. After all that is one of your ultimate goals with your business – to make money.
- Every time you launch a new product/book or report you can email your list and let them know.
- You can bundle up products, create coupons and give them to your list as a Customer appreciation feature.
Of course your next question is “How do I build a list?”
To make list building work for you, you must be willing to spend about $20 per month at first. This is so you can invest in an Autoresponder Service.
Here’s a link to the one I use: [Add affiliate Link]
There are several benefits to using this type of service:
- They have the ability to get your emails delivered – this is a huge issue if you try and mail from your own site.
- You can easily write one email and sent it to thousands of people.
- You can create lots of different lists inside your account. This allows you to target your customers with the right content and products.
- The service has great templates that you can use.
- These emails will be formatted for mobile devices – huge plus!
- People can easily unsubscribe with one click.
- You can add images and video links into your emails.
- Great way to brand your business.
- Makes you look totally professional.
- Easy to use.
Just think about how your business could benefit from having its own email list. You could easily offer:
- Gifts on subscriber’s birthdays
- Coupons and discounts
- Personalized messages
- Announce new sales and products
- Deliver an email course via this service
- And more…
Take a look at my recommendation again here: [add link]. They have a low cost trial which I suggest you sign up for. Plus there are lots of tutorials as well. If you do get stuck send in a support ticket or give me a shout. I am always happy to try and help you out.
I know this is a lot to think about and digest, but building a mailing list will be a huge asset for your business. You can even set messages up on autopilot so you don’t have to worry about a thing when you are away. Imagine being on vacation and sending out promotions and making money! That’s an aspect I truly enjoy.
Thanks for reading.
[Your name, email, website]
P.S. If you have any questions regarding this report feel free to email me, just hit reply to this message and I will get back to you quickly. Or customize with a link to a relevant product on this topic.
11. Building Your List – The Ups and Downs
Hi,
So I had lots of great feedback from my email the other day about building a list. The potential of creating more money was a good benefit for many. For those with a service a list allows you to offer your subscribers special offers and incentives and to showcase your work.
Now I am going to be totally honest with you here. As with anything there are always some drawbacks. Today let’s discuss some of those.
The number one drawback – eventually it won’t feel like a drawback is that of Unsubs. An unsub is when someone decides they don’t want to be on your list. Believe me, when this first happens you are going to feel extremely disappointment. You may even experience that stab of pain in the pit of your stomach.
The thing is you have to get used to it. Unsubs are just part of list building and something you want to get accustomed too.
Let me put it in another perspective.
You are paying for your autoresponder each month. The more subscribers you have, the higher your cost will be. So why do you want to be paying for someone who is not reading your emails? Let them unsubscribe, be glad they are gone.
The upside is that you will eventually build a list of eager readers and this means that your Open rates will increase and that you will sell more of your product, recommendations and services.
Remember that you cannot please everyone you meet. Just concentrate on those that enjoy what you have to offer.
Thanks for reading.
[Your name, email, website]
P.S. If you have any questions regarding this report feel free to email me, just hit reply to this message and I will get back to you quickly. Or customize with a link to a relevant product on this topic.
12. Building Your List – Creating Lists
Hi,
Now that you know what to expect with list building, let’s get down to the nuts and bolts. Once you have signed up to your Autoresponder service your first step is to create your first list.
After several years of trial and error let me save you a few headaches. When naming your lists try to make them easy to remember and relevant to your website. This will be easy if you are just going to work with one website and offer similar products. But if you offer a variety of topics such as Hobbies, Health, Woodworking etc., you will want to keep each list very specific.
Try to come up with some type of system for your lists. I like to use the list name in this manner when sending out emails, as it helps your reader identify who the email is coming from.
[listname] Title
If you are working in the health field you may want to name your lists as follows:
LoseWeightFreebie01
NaturalEating02
And so on…adding numbers always you to create more detailed lists so that you can send out targeted emails to those readers and buyers.
You may want to have a main buyer’s list as well:
NaturalEatingMain
Then as people come from your freebie list and make a purchase they can be placed onto your buyers list. This is the list that is going to help you make money, so treat them well. I like to send out a few freebies now and again to my buyers list.
So try and think of a filing system that will help you keep your lists manageable. Go ahead and create your first list and in my next email we will discuss how to get someone to join your list.
Thanks for reading.
[Your name, email, website]
P.S. If you have any questions regarding this report feel free to email me, just hit reply to this message and I will get back to you quickly. Or customize with a link to a relevant product on this topic.
13. Building Your List – Getting Subscriber’s
Hi,
So by now you should have a new list set up in your Autorepsonder account. Today let’s discuss how to get people to join your list.
As I mentioned in an earlier email you want to have an incentive on your website, in order to get someone to join your list. Here’s how you can do this.
Create a Newsletter and invite readers to join
Give away a free report, article or video
Sell a product at a really low price and this places buyers onto your list
These items don’t have to be huge at all. A quick 5 page report is enough, or a 2 minute video explaining something will suffice.
You can write these reports yourself, look for free reports that can be given away or use PLR to create your own customized version. I talked about PLR in an earlier email – this is where I get most of my content from:
[add affiliate link to PLR provider]
Once you have this in place your next step is to create an Opt In form on your website. This form needs to be placed above the fold. This means that when someone lands on your website the form should be visible without the need for scrolling down.
We will add your opt in form to your website in the next email. For now just work on getting your freebie gift ready.
Thanks for reading.
[Your name, email, website]
P.S. If you have any questions regarding this report feel free to email me, just hit reply to this message and I will get back to you quickly. Or customize with a link to a relevant product on this topic.
14. Building Your List – Opt In Forms
Hi,
In my last email we talked about having a freebie or gift to give to your subscribers. Today I will walk you through adding an opt in form to your website. This actual process is going to vary depending upon what Autoresponder service you are using.
Here’s the basic idea.
Creating your forms is really easy. Log into your Autoresponder account and click on the Create Forms under your list name.
Then just follow the instructions to create the form. You will have lots of templates to choose from. Just pick one for now, you can always change it later on.
Once you get to the end of the process, it is just a matter of copying the code and pasting it into your website.
To do this you will log into your dashboard.
Go to Appearances – Widgets – Text
Drag this Text widget into your side bar and paste in your code.
You may also want to place this Optin form at the end of each blog post. Do this you will need to go to the Text button on your post and paste in the code.

Basically it is a very easy process and once you have done it a few times you will feel really comfortable at creating your Opt In forms. Remember you can always go back and change the design of your form at any time. If you use the short code it will update on your website as you make changes from your AR account.
Try it out and see how you get on. Let me know if you run into any problems.
Have a wonderful day!
[Your name, email, website]
P.S. If you have any questions regarding this report feel free to email me, just hit reply to this message and I will get back to you quickly. Or customize with a link to a relevant product on this topic.
15. Building Your List – Follow Up Messages
Hi,
Now that you have all the components in place to build your list, you need a way to communicate with them once they have subscribed.
This can be done in two different ways inside your AR account.
There are basically three types of messages you can send:
- Follow Up Messages
- Broadcast Messages
- Blog Posts
A follow up message is the message that is send from your AR account once someone has decided to join your list. This is a sequence of messages which can last anywhere from one or two messages to an entire sequence lasting a year.
These are scheduled messages that you can set to send at a certain time, date or every so many days.
It is up to you to decide how many messages you want to add. This will depend upon what content you are going to offer.
Educational type of content could be spread out over a couple of months
If you list is a freebie list your goal would be to turn them into buyers. So you may want to include around 7-10 messages in your sequence. Research shows it takes, on average at least 7 messages before someone is ready to make a purchase.
The goal of your follow up messages is to give your subscribers time to know, like and trust you. This way when you do make a recommendation to purchase a certain product, they are more likely to do so.
A broadcast message is one that is sent to your subscribers as soon as it is created. This type of message can be used to notify your list of a new product release, news announcement or something spur of the moment. They are normally send in conjunction with follow up messages.
Again it is up to you to experiment and see what works for you. This is something that I do that seems to work well for my list.
Place on new subscribers on a sequence of emails for about 10 days. After this time I start adding broadcast messages. If I find something really good I may also add this into my follow up sequence for newer subscribers.
The last type of message is simply a notification that you have published a blog post. Your subscribers will be sent the link to your latest post each time you publish one.
Let me know if you have any questions on this topic.
Thanks
[Your name, email, website]
P.S. If you have any questions regarding this report feel free to email me, just hit reply to this message and I will get back to you quickly. Or customize with a link to a relevant product on this topic.
16. Tips for Your Follow Up Messages
Hi,
Before you can start writing your follow up messages there is one critical aspect you need to take into account.
That is knowing what your overall purpose of your emails are.
- Is your goal to sell them an ebook?
- Do you want your subscribers to take an action such as filling out a form, or clicking a link?
- Do you want them to like your Facebook page or another action?
Determine what your ultimate goal is and write it down somewhere for reference.
Once you know what your purpose is, it will be much easier to write those actual emails.
Keep the following in mind:
Email 1 – should just be a quick thank you and where to download their freebie.
Email 2 – Introduce yourself and explain how often you are planning on sending out your emails. Add in any expectations and more.
Email 3 – continue to build a relationship. Show examples of how to use a certain product, give advice, reviews, tips etc
Email 4 – Now you can start to add in a recommendation to a proven product that will help your subscribers in some way.
Email 5 – continue building a relationship and adding in recommendations, offer to answer question, invite to your Facebook group.
Emails 6 & 7 – continue this process, it never hurts to send out another, related free gift or video to your list. Always keep in mind that you want your subscribers to know, like and trust you.
Hope that helps.
Thanks
[Your name, email, website]
P.S. If you have any questions regarding this report feel free to email me, just hit reply to this message and I will get back to you quickly. Or customize with a link to a relevant product on this topic.
17. The All Important Aspect – Traffic
Hi,
By this point you have your website set up, a freebie gift ready to give away and have an opt in form on your website. So of course the next step is to know how to get traffic to your site.
There are various ways to get traffic to your website and this includes both free and paid options. This is a huge topic so I will just give you an outline of some good methods that I have tried and found worked for me.
- Setting up a blog and posting regularly will help you with traffic. As well install Social Sharing buttons on your site, and use those yourself after every new blog post.
- Join a 30 Day Blogging Challenge – this works well and here’s the one that I did – it’s free to join. http://www.sarkemedia.com/blogging-challenges-traffic/
- Set up Google Alerts in your niche to alerted when new posts or news items are available. Then go post on top blogs and leave relevant comments.
- Post about your website on all your social media sites. Share snippets of posts and images and encourage people to share them with their friends.
- Offer to write a guest post for another blogger that has similar content to your own.
- Go to Yahoo Answers and look for questions that you can answer about your niche.
- Do some keyword research and include these words in your blog posts.
- Write product reviews that pertain to your blog.
- Create and post videos to your site and on You Tube, this can really be a great source of traffic for you.
- Interview top marketers and bloggers in your niche, or offer to be interviewed yourself.
- Create your own Facebook Page or Group and be active in it. While you don’t own your group it can be a great way to connect with your audience.
- Create a Tumblr Blog and post to it regularly.
- Submit your website and blog links to directories.
- Write and submit some of your articles to article directories.
- Consider setting up a Podcast channel.
Go through the list and pick out a couple of methods to try and see what results you get. Just always keep busy publishing posts, being on social media and work on branding yourself at all times.
Connecting with others through forums is another good option of building relationships with other marketers who could eventually become great business connections.
Hope you enjoyed this email.
[Your name, email, website]
P.S. If you have any questions regarding this report feel free to email me, just hit reply to this message and I will get back to you quickly. Or customize with a link to a relevant product on this topic.
18. Recap of Where You Are Now
Hi,
Over the last several weeks you have come a long way in regards to creating an online presence. Congratulations!
You have set up your website, learned how to add content to it. Created an opt in form for your subscribers and discovered several methods of driving traffic to your site.
You should also have created several follow up messages for your subscribers. Don’t forget that you can add affiliate links into these messages, this will help you to generate additional income.
Today I just wanted to go over some of the basics of list building again. This is because you really want to reinforce the concept of list building into your business plan.
List building is not something that can be stopped, it needs to be an ongoing task.
If you find that your opt ins to your free report stop, set up a new gift or report on a new squeeze page.
In fact most good marketers have several opt in forms placed all over the internet. This provides them with multiple chances for building their list.
So start setting up a new opt in page today. Here’s a great tool that I like to use that helps you set up your pages easily. It’s a plugin and you have the option of purchasing themes that go with it too, if you wish.
[Add link to something such as Thrive Themes & Plugins, or whatever you use to create your squeeze pages.]
You have done a fantastic job up to here. Now it really is just a matter of rinsing and repeating the process.
As always let me know if you have any questions.
Thanks for reading
[Your name, email, website]
P.S. If you have any questions regarding this report feel free to email me, just hit reply to this message and I will get back to you quickly. Or customize with a link to a relevant product on this topic.
19. Branding Your Content
Hi,
Now that you have a good understanding of how to build your list. Let’s take a look at how to brand your business.
Branding your business is helpful as it allows your readers to immediately identify content as belonging to you.
Branding doesn’t have to be a difficult process. It can be as simple as including certain colors in all of your content. Whether you are writing a blog post, creating a poster for social media or creating a brand new report.
If you decide to use PLR, branding it with your logo really helps you customize the content.
Another way to brand your content is by adding your photo and an about page to all of your reports. This can be placed at the end of the report and is a good way to reinforce who you are, and your expertise to your readers.
On this page you can include links to other products, your social media pages, plus you can recommend your favorite tools and resources. Another great way to generate some affiliate income.
Your task for today is to start branding your content from now on. Select colors from your website and start using them. It is fairly easy to add these colors into your reports and graphics that you can create.
Let me know if you have any questions.
[Your name, email, website]
P.S. Customize with a link to a relevant product on this topic.
20. Content Creation Tips
Hi,
Today I want to cover some additional content creation tips for you. At first it is easy to write fresh content, but after a while you may run out of ideas. So what do you do?
Well one of the things I like to do is to make sure that I subscribe to lists that highlight my niche. This can often provide you with great ideas of what to write.
For example, if you are in the health niche you want to stay abreast of new developments, so you let your readers know immediately.
Start subscribing to other people’s content by using an RSS reader such as Feedly.
You should also subscribe to top blogs and magazines in your niche by using Google Alerts.
Another good tip is to visit related forums and see what topics are being discussed. This is a great way to create useful blog posts and tips. Or to even create a brand new report that you could end up selling.
Social media is another outlet where you can find topics to write about. Don’t forget Pinterest! Visit and see what is being ‘pinned’. I often find that pictures can easily inspire me, don’t you?
As long as you get into the habit of checking out top blogs, watching the latest headlines you should never run out of topic idea.
As always please let me know if you have any questions at all.
[Your name, email, website]
P.S. If you have any questions regarding this report feel free to email me, just hit reply to this message and I will get back to you quickly. Or customize with a link to a relevant product on this topic.
21. Monetization Tips
Hi,
Now that you have your website up and running and are building a list, your next step is to think about how to monetize everything?
What does this mean?
Well it simply means it’s time to start thinking about how you can generate an income with your website and your list.
One of the best ways to monetize your site is by adding affiliate links to it.
For example if your site is aimed at teaching your visitors how to set up a site, you want to target related products.
- Web hosting
- Domain Names
- Premium WordPress Themes
- Auto Responder Service
- Graphics software
- Photo images
Pretty much any tool or service that could be helpful to your readers. You would weave these links in so that it seems natural for your reader to click on them and make a purchase, or even to take a free trial.
And by now, you are starting to generate trust with your readers they are more ready and open to purchase an item that you suggest.
The services you choose to recommend can be those that you actually use. Why not recommend the same web hosting company, if you are happy with them. The same goes for your autoresponder service. By recommending the tools that you use, you can easily answer any questions that might come up – making you look even more like a pro!
You can do exactly the same with your list. Slowly suggest tools and services that they may find helpful.
One way to showcase the products you are recommending is by writing up a product review about it. You can then highlight any pros and cons, or features that you really like. At the end of the review simply add in your affiliate link and tell your readers to check out the sales page here – or words to a similar effect.
If you are not sure what to offer just do a quick Google search for your niche + affiliate programs and see what comes up.
Always look for programs that are free to join, pay out to your country – preferably by PayPal, and do not require you to reach a certain dollar amount before being paid.
So go take a look at what affiliate programs you find and join one or two. Then add the links to your site, and in any appropriate emails and see what happens. It can sometimes take a little while before you make any sales, but it will be such a thrill when you make that first affiliate sale!
Good luck with this portion and if you have any questions just send me a quick message.
Thanks for reading.
[Your name, email, website]
P.S. If you have any questions regarding this report feel free to email me, just hit reply to this message and I will get back to you quickly. Or customize with a link to a relevant product on this topic.